
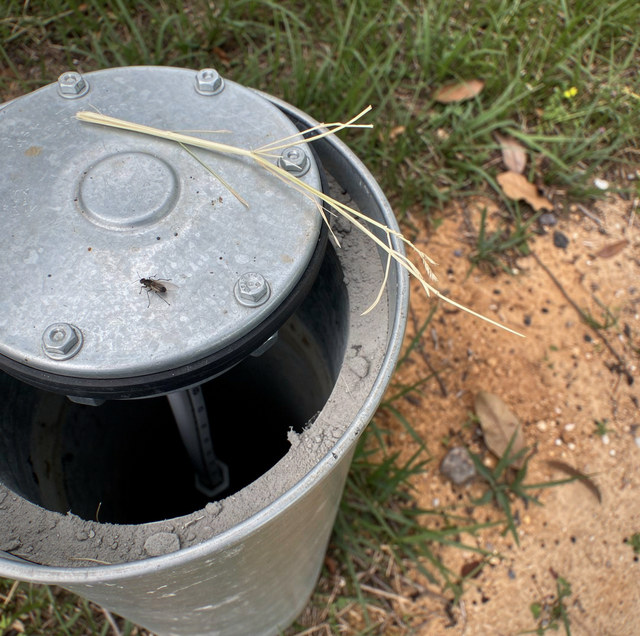
Ants trailing across the top of your casing, a dead beetle lying on the wiring, a gray silt line inside the rim: that is what a technician finds when your well cap has stopped doing its one job. None of it arrived there because the cap had gone missing. In most cases, your cap is still bolted down, still looks sound enough to you from ten feet away, and is still passing material through a seal that hardened, split, or was never the sealing kind. What reaches your water afterward, and what it does to your pump, follows from an opening you cannot see and would not hear if you stood beside it.
The Cap Most Wells Carry Was Never Built to Seal Anything
Two different objects get called a well cap, and which one you have changes how much of this applies. The common one is a plain cover held on by bolts through the side of its skirt, clamping it against the outside of the casing to keep rain and leaves off a pipe. Extension guidance on sanitary well caps states that the shape and the small airspace between the well cap and the casing can allow insects, small mammals, or surface water to enter the well.
The sealing version is the sanitary or vermin-proof cap, and the same guidance separates the two by where the bolts sit, on top rather than around the sides. Under it sit three parts the cover lacks: an airtight rubber gasket seal, a hole for the electrical conduit, and a small screened vent for air exchange. If the well you own was finished with the plain cover, nothing has failed. It never had a seal.
Compression Is the Whole Mechanism, and It Fades With Age
A gasket does not seal by touching your casing. It seals because the bolts squeeze it between the cap and the pipe wall until the rubber deforms sideways, filling every irregularity in the cut edge, and it holds only while the rubber keeps pushing back. Elastomers lose that push. Held under constant load, warm, and in sunlight, the polymer chains rearrange into the compressed shape, so when the load eases, the rubber no longer springs back to its thickness. Engineers call the loss compression set. A gasket that has taken a permanent set can still look intact, still sit in its groove, and no longer touch your casing all the way around.
A cap in that condition passes a look from the driveway and fails at once, which is why the seal is judged by what you find inside the casing rather than by appearance.
Bolt tension goes the same way. Stainless hardware in a threaded aluminum or thermoplastic cap creeps under load and relaxes over years of heat cycling, and a quarter turn of lost tension is enough to drop the gasket below the squeeze it needs. Nothing about that is visible to you either. The other half is service history: every time the cap comes off for pump work, the gasket is disturbed, and a gasket that was already set does not re-seat when the cap goes back on. That is a reason to ask what was replaced the last time your pump came up.
The Conduit Entry Is the Opening Almost Nobody Inspects
Power for your submersible pump crosses the top of the well, so a sanitary cap is made with a hole for it. A diagram of a sanitary cap labels three features on the same part: the rubber gasket, the hole for electrical conduit, and the screen holes for ventilation. The hole is closed around the cable by a compression bushing or a grommet, and that bushing is a rubber part aging on its own schedule.
Where the bushing perishes, or the wiring was pulled through without one, you have an open path from outside air into the casing at the point insects already gather. The same guidance, citing a study of more than 100 private wells, records that nearly 50 percent had obvious insect infestations under the well cap, with insects found inside the well cap, on the wiring or plumbing, or inside the casing.
A Torn Vent Screen Turns Breathing Into Open Access
A sealed cap still has to let the well breathe. The water level inside the casing rises and falls every time your pump starts and stops, and the air above it has to move out and back, or the column fights itself. The screened vent is for that purpose, and the same guidance pairs the airtight rubber gasket with a small, screened vent to allow air exchange.
The screen is the most fragile material in the assembly. Fine mesh corrodes, tears against a tool, or gets pushed inward during service, and an open vent is a sized hole leading straight down the casing. Mud daubers build in vents. Ants use them as a door. Grit washes through them, and none of that requires the gasket you have to have failed at all.
Debris That Falls In Ends Up Down at the Pump Intake
Nothing that gets past the cap stops at the top of the well. Your casing is a vertical pipe with the drop pipe and the pump cable running down the middle, and the space around them is open all the way to the water. Insect bodies, nest material, leaf fragments, and the grit that washes off the rim take that route down. Some of it floats. The rest sinks onto the pump, the intake screen, or whatever ledge the casing offers, and it stays there because a well has no current.
The intake is the point where it becomes your problem. A submersible pump draws through a screen sized to keep the formation's sand out, and organic debris blinds that screen from the inside face, which you see as reduced flow at a pump that sounds healthy. Finer material rides through to the impeller stages, where it wears the same close clearances sand wears. Downstream, your sediment filter loads faster than its usual interval, and most people notice a cap problem at the filter first.
Grade and Standing Water Turn the Cap Into an Inlet
Standing water at the base of your casing is the other half of it: the spot that ponds after rain carries silt to the cap. Extension guidance is clear: the best protection for an existing well is to ensure that the ground surface slopes away from the well casing in all directions, directing surface water away from the wellhead area. Grade changes quietly: mulch gets topped up, a bed goes in, and a casing that once stood proud sits in a dish.
Irrigation does the same work more slowly. A rotor head aimed across a wellhead soaks the cap weekly, and repeated wetting at the gasket line does more than rain manages. Where the casing you own sits too low to shed water, raising it is a job covered in this blog's own post on wellhead extensions.
The Repair Is Live Electrical Work at a Potable Opening
Lifting the cap to look is not a homeowner step, and the reason is electrical. The conductors feeding a submersible pump pass through the cap on the way down, so the safe move is to leave it seated and have a licensed technician open it rather than lifting it yourself to inspect a gasket you cannot reach.
A well that has been open to insects gets chlorinated before you get it back in service. Well chlorination and well seal replacement are both ordinary line items, and the seal is the half that keeps it closed.
Frequently Asked Questions
No. A new cap closes the route in and does nothing about what reached your well before it. Retest for total coliform bacteria about 10 to 14 days after disinfection; where none is present, run another test after a further two to three months, and install a continuous disinfection system if the bacteria return. If insects have been in your casing, you want the chlorination first, and you want your cap after it.
Often a worse version of it. An irrigation well often gets the plainest cover available because nobody drinks from it, and it sits inside the zone its own heads water. The same ingress applies, and the debris goes where yours goes: the intake, the impellers, and the filter screen ahead of your zone valves. It is also the well you never look at until you lose a zone.
What you pull out of your filter separates them. Material from above ground looks like what is above ground: leaf fragments, wing cases, nest mud, and dark organic fines. Material from the formation is mineral-based, pale, and gritty to the touch. You can have both at once, and they point at two different repairs in two different places.
No interval applies to your well: the load, the sun, and the metal your gasket seals against all differ. The practical rule is that a gasket gets replaced whenever the cap comes off, not inspected and reinstalled, since compression set is invisible and a second seating rarely restores it. Ask what went back on your cap the last time your pump came up.
Yes, and often enough to matter. String trimmers chew the plastic skirt of a cap, mower decks clip the vent, and a truck over a low wellhead cracks the casing weld. Damage at ground level is the one thing you can check on your wellhead without touching your cap.
More than the cap. A pump service call on the sealed side is described as work that helps ensure the system operates efficiently, has no leaks at the suction and discharge piping points, and that the gland and seals are in good condition, which is a broader check than the one part you called about. In practice, that covers your cap and your gasket, the conduit bushing and vent screen, the casing penetration just below them, and the packing or mechanical seal on any above-ground pump on your property. Crews run Monday through Sunday, 6am to 8:30pm, with around-the-clock emergency service.
Have a failed well cap seal repaired - a licensed pump technician handles the live conductors passing through it, fits the gasket, conduit bushing, and vent screen your casing takes, and chlorinates a well that has been standing open. Pump Repair Services serves Apopka and the surrounding Central Florida area. Call (407) 809-8805.